Free Throw (stage)

From Bananapedia
Jump to navigation Jump to search
For the Banana Blitz party game of the same name, see Free Throw (Party Game).

Free Throw is the 6th Expert Extra stage of Super Monkey Ball 2, Super Monkey Ball Deluxe, and Super Monkey Ball Banana Mania, the 256th Ultimate stage without continues, and the 116th Marathon stage of Super Monkey Ball 2 in Super Monkey Ball Banana Mania.

Description

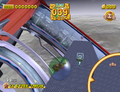
The stage is set up on a long platform. The first part, closest to the starting point, can launch the ball. There are three goals disguised as basketball hoops, one near the start, one in the middle, and one near the end.

Goal Tutorial

Blue Goal

To get into the blue goal, roll right past the launcher. Turn around as soon as it has lowered back down; and roll four squares across on the launcher. Stay as straight as possible, and come to a full stop once you are four squares across. This should launch you into the goal. Use the map if needed.

Green Goal

This is considered hard. Roll past the launcher, and then roll about eight squares across on the launcher after it has lowered back down. Adjust your position in the air if it looks like you will miss the goal. Use the map if needed.

Red Goal

Strategy 1

This is considered very hard. Roll past the launcher, and then roll about eleven squares across on the launcher after it has lowered back down. Adjust your position in the air if it looks like you will miss the goal. Use the map if needed.

Strategy 2

Roll onto the very top of the launcher, and be launched as high as possible. Move forward until you approach the red goal. Try to land into the goal. However, if you miss it, you can keep trying to land into it until you can't bounce as high as the elevation of the red goal.

Trivia

  • In basketball, free throws are unopposed attempts to score points from a restricted area.
  • A party game with the same name can be found in Super Monkey Ball: Banana Blitz.
  • In Super Monkey Ball Banana Mania, this stage has had its number of bananas reduced. This is unusual as most returning stages have had their banana counts increased, often quite significantly.
  • Uniquely, the Helper Function's arrow guide for this stage in Banana Mania recommends the player aim for the green goal instead of the blue goal. This is likely due to it arguably being easier to get the green goal than the blue goal in this game.
  • In Banana Mania, the topdown map has a limited render distance. On this stage, the render distance limit will often be reached when being launched up, causing the stage to disappear on the map.

Gallery

Super Monkey Ball 2 Stages
SMB2 B icon.png SimpleHollowBumpySwitchesBowlFloatersSlopes SlidersSpinning TopCurve Bridge
SMB2 A icon.png BanksEaten FloorHoppersCoasterBoard ParkSwellGravity SliderInchwormsTotalitarianismLevelerOrganic FormReversible GearStepping StonesDribblesU.R.L.Mad RingsCurvy OptionsTwisterDownhillRampagePro SkatersGiant CombBeehiveDynamic MazeTriangle HolesLaunchersRandomizerCoin SlotsSeesaw BridgesArthropod
SMB2 E icon.png WormholeFree FallMelting PotMad ShufflePartitionJump MachineZigzag SlopeTowerTogglePachinkoCombinationPunched SeesawsOperaBrandishedTiersCliffsNarrow PeaksDetourSwitch InfernoEarthquakeSpiral BridgeWavy OptionObstacleDominoSieveFlockDouble SpiralHierarchy8 BraceletsBanana HuntingPistonsSoft CreamMomentumEntangled PathTottersVortexWarpTrampolinesSwing ShaftFightersSerial JumpCross FloorsSpinning SawChipped PipesFlat MazeGuillotineCork ScrewOrbitersTwin BasinAir Hockey
SMB2 BX icon.png ConveyersBumpy CheckAlternativeJunctionBead ScreenFluctuationFoldersQuick TurnLinear SeesawsBirth
SMB2 AX icon.png Auto DoorsHeavy SphereStaggerU.F.O.Ring BridgesDomesAmida LotLong SliderGrid BridgeTeapot
SMB2 EX icon.png ChargeStrataPuzzleGiant Swing5 DrumsFree ThrowPendulumsConical SliderConstructionTrain Worm
SMB2 M icon.png CentrifugalSwing BridgesCylindersPassageNotchIntermittentLong TorusSpasmodicDouble TwinClock Face
SMB2 MX icon.png Variable WidthStrikerOopartsPlanetsSliced Cheese8 SeesawsSynchronizedHelixDizzy SystemNintendo
SMB2 S icon.png TrainingGimmickMountainDisorder3D MazeLabyrinthPostmodernRevolutionInvisibleCreated By
Debug Mode Padding StageStage 181
Super Monkey Ball Deluxe Stages
SMB2 B icon.png PlainDiamondHairpinWide BridgeSimpleHollowBumpySwitchesFloatersBonus BasicEdgeEscalatorsSerpentineSwirlDormant PitsCompositionDynamoLunchboxGutterRising InclinesSlopesStepsBlocksJump SingleExam-ATubWindy SlideSpinning TopCurve BridgeScabrousJolt ChannelInertialOctagonalSewerArc BridgesVeer FieldTeeterStreamCatwalkCatapult
SMB2 A icon.png BumpWalkingRepulseNarrow BridgeBreakCurvesDownhillBlocks SlimChoiceBonus WaveJump RampHounds ToothD.N.A.BuildingScrollsCliffConcentricStadiumDungeonBonus GridBanksEaten FloorHoppersCoasterSwellGravity SliderInchwormsTotalitarianismOrganic FormBoard ParkBowlJumpiesStoppersFloor BentConveyerExam-BChaserJump DoubleMiddle JamLevelerReversible GearStepping StonesDribblesU.R.L.Mad RingsCurvy OptionsTwisterCascadePro SkatersRampageAnt LionCollapseSwing BarLabyrinthSpiralWavy JumpSpikyUnrestPolarParaboloidGiant CombBeehiveDynamic MazeTriangle HolesLaunchersRandomizerCoin SlotsSeesaw BridgesArthropodSpatiotemporal
SMB2 E icon.png RuinBranchOverturnExcursionDodecagonExam-CSkeletonTracksDownhill HardBonus BumpyWormholeFree FallMelting PotMad ShuffleJump MachineZigzag SlopeTowerToggleCombinationBonus HuntingGearsDestructionInvasionDivingFloor SlantTramSwing Bar LongPaper WorkTwin AttackerPartitionPunched SeesawsOperaBrandishedTiersCliffsNarrow PeaksDetourSwitch InfernoSpiral BridgePachinkoSega LogoSnakeWindSlidersFall DownTwin CrossSpiral HardConveyer PartsGapsEarthquakeWavy OptionObstacleDominoSieveFlockDouble SpiralHierarchy8 BraceletsPistonsBanana HuntingCurvatureAnt Lion SuperDrumTwisterSpeedy JamQuakeCassiopeiaPiratesBowl OpenFightersSoft CreamMomentumEntangled PathTottersVortexWarpTrampolinesSwing ShaftSerial JumpShelterCheckerCarpetRidgeMixerRingsStairsCloverCoffee CupMetamorphosisMobiusCross FloorsSpinning SawChipped PipesFlat MazeGuillotineCork ScrewOrbitersTwin BasinAir HockeyAsterisk
SMB2 BX icon.png Blur BridgeHitterAV LogoRhombusBuoyConveyersBumpy CheckAlternativeJunctionBead ScreenCoil RampMillefeuilleWaverFat SeesawTreadsFluctuationFoldersQuick TurnLinear SeesawsBirth
SMB2 AX icon.png Blur BridgeHard HitterPuzzleAV LogoPolar LargeAuto DoorsHeavy SphereStaggerU.F.O.Ring BridgesChaosTilt MazeFractalHillsDodge MazeDomesAmida LotLong SliderGrid BridgeTeapot
SMB2 EX icon.png ChargeStrataSquare DanceGiant Swing5 DrumsFree ThrowPendulumsConical SliderConstructionTrain WormBlur BridgeBreatheHard HitterFerris WheelFactoryCurl PipeMagic HandAV LogoSanctuaryDaa Loo Maa
SMB2 M icon.png CentrifugalSwing BridgesCylindersPassageNotchIntermittentLong TorusSpasmodicDouble TwinClock FaceWave MasterFan MasterStamina MasterSpring MasterDance MasterRoll MasterEdge MasterDodge MasterBridge MasterMonkey Master
SMB2 MX icon.png Variable WidthStrikerOopartsPlanetsSliced Cheese8 SeesawsSynchronizedHelixDizzy SystemDestiny
SMB2 S icon.png TrainingGimmickMountainDisorder3D MazeCrazy MazePostmodernRevolutionInvisibleCreated By